Home, sweet home
28 October, 2013
Summary
Yes, a summary, because that's gonna be a LONG article.
Introduction
Okay, so you have finally installed your distro of choice, cleaned the whole setup, installed X.org, xterm and vim...
And now, what?!
I've asked myself this question more than I should (probably because
I liking tweaking my desktop, but that's not the point here).
And I bet that you did too !
In this post, I'll go through all the mandatory tweak that should be
done to a clean base system. YOUR system, 'cause there is no place
like home.
Once standing in your ~, starring at your shell prompt, you should
be like Uuuh that is life, eh!
I'll not wait more to give you my secrets, but please, keep in mind that these are MY OPINIONS and I'm not asking you to agree with me. If you feel uncomfortable with some points, just avoid them. You're not here to feel bad, but to find advices on setting up your home!
Window manager
This is the most important part of your future environment. It is the god that will tell all your windows where to go, how to move, etc.. So you can take a little time to choose a WM, it totally understandable.
There are three types of window managers:
- Floating — windows overlaps
- Tilling — windows are arranged in tiles (kinda like a grid)
- Dynamics — both floating and tilling are possible
- Aliens — Go home WM, you're drunk.
Floating management is the management style we're all used to,
windows are independent and you can resize/move them freely around
your desktop.
Tilled window managers arrange the windows depending on what is
currently on your desktop. The windows CAN'T overlap. When
you create a new window, the whole set of window is rearranging to
let the new window find a place (Not always in fact, but that's the
idea behind tilling).
Finally, dynamic WM can switch between the two managment styles
(most of the time, at cost of complexity and binary size, but that's
just my opinion). Note that most tilling WM are, in fact, dynamic
WM. But the way they manage floating windows is just so poor...
Oh, and for the alien part, keep in mind that some WM just don't manage windows like that. But their behaviors are to specific to be described here. Just RTFM 'em.
FYI, here is a non-exhaustive list of window managers I like (F = floating, T = tilling, D = dynamic... U DON'T SAY!)
- cwm — Calm Window Manager (F)
- Ratpoison (A)
- ctwm (F)
- herbstluftwm (T) (
Hebrstrutoflutudobleyouhem
) - evilwm (F)
- xmonad (D)
- spectrwm (T)
- ...
Note that I DIDN'T mentioned AwesomeWM or openbox. beuâh.
Once you have chosen your WM, go through its manpage/doc, set it up to look the way you want. Use stuff like librgba, compton to make it even prettier!
 Here is a quick CWM setup, using compton and
librgba
Here is a quick CWM setup, using compton and
librgba
Oh! A last advice, do not bind applications through your WM. Using an application like xbindkeys to do that is a better idea, as it follow the UNIX philosophy, and it will help you a lot if you want to try another WM.
Terminal
Here we are. The terminal. The central part of the whole setup!
As an advanced user, you spend a lot of time within the terminal, so it is
important to keep your terminal a pleasant place for your eyes.
There are, in fact, only two ways to tweak your terminal: colors and font.
The goal is to find the best readability/usability/awesomeness ratio.
I'd recommend that you start from a dark scheme, as it's better for your eyes
by night (But that's just my opinion, light colorschemes can look pretty
good!). Terminals usually manage up to 256 colors, but you will use only 16
of them:
→ [0-7] for normal text
→ [8-15] for bold text
Here is the color chart:
| black | red | green | yellow | blue | magenta | cyan | white | |
|---|---|---|---|---|---|---|---|---|
| dark | 00 | 01 | 02 | 03 | 04 | 05 | 06 | 07 |
| light | 08 | 09 | 10 | 11 | 12 | 13 | 14 | 15 |
Now, just tweak each color to fit your perfect theme!
To do so, refer to the manual of your terminal.
If you don't have one, here is a list of terminal you can use:
I have stick with rxvt-unicode (urxvt) personnally. I find it pretty powerfull, light and fast. Also, it can be extended in perl, which is great (muh URL selection).
Back to terminal colors! The best way I know to change the terminal
colorscheme, is using the X server resource database (xrdb). But it
does not work with every terminal (it works, at least, with xterm and
urxvt).
All you have to do, is configure your colors in a file called
~/.Xresources, and source it with the command:
xrdb -load ~/.Xresources
For example, here is mine (screenshot at the end of the section):
Xresources

*background:#222222
*foreground:#e8e9ca

*color0:    #222222
*color1:    #8b3e2f
*color2:    #526f33
*color3:    #665847
*color4:    #4a708b
*color5:    #7a378b
*color6:    #528b8b
*color7:    #999999

*color8:    #4c4c4c
*color9:    #d75f00
*color10:   #cee318
*color11:   #eee685
*color12:   #9ac0cd
*color13:   #9f79ee
*color14:   #79cdcd
*color15:   #e8e9ca
For the font, it's quite the same, but I suggest that you search for the terms xft font, bitmap fonts and X resources cause it can be a little tricky to understand.
Quickly, there are two way to draw fonts in your terminal, with, and
without xft. XFT allows you to draw nice fonts and scale them the
way you want, like BitStream Vera Sans, Monospace, etc... But these
are "slow" to draw.
The other method is the one used by TTY, bitmap fonts. Those are
fixed pixeled font that can look odd, but draw fastly.
Just make a choice.
To declare a XFT font:
xft:<font name>:size=<size>
Bitmap font are declared like this (taken from xfontsel -print, thanks to Gnu42 for the package). You can then use the xfontsel package, or look for a file named fonts.dir in your font directory.
-fndry-fmly-wght-slant-sWdth-astyl-pxlsz-ptSz-resx-resy-spc-avgWdth-rgstry-encdng
Here is a small example:
Xresources

*font: xft:monospace:size=10
*font: -misc-tamsyn-medium-*-*--14-101-*-*-*-*-*
So, we have seen how to tweak the terminal, let's see what it looks like! I wrote a small script for the purpose:
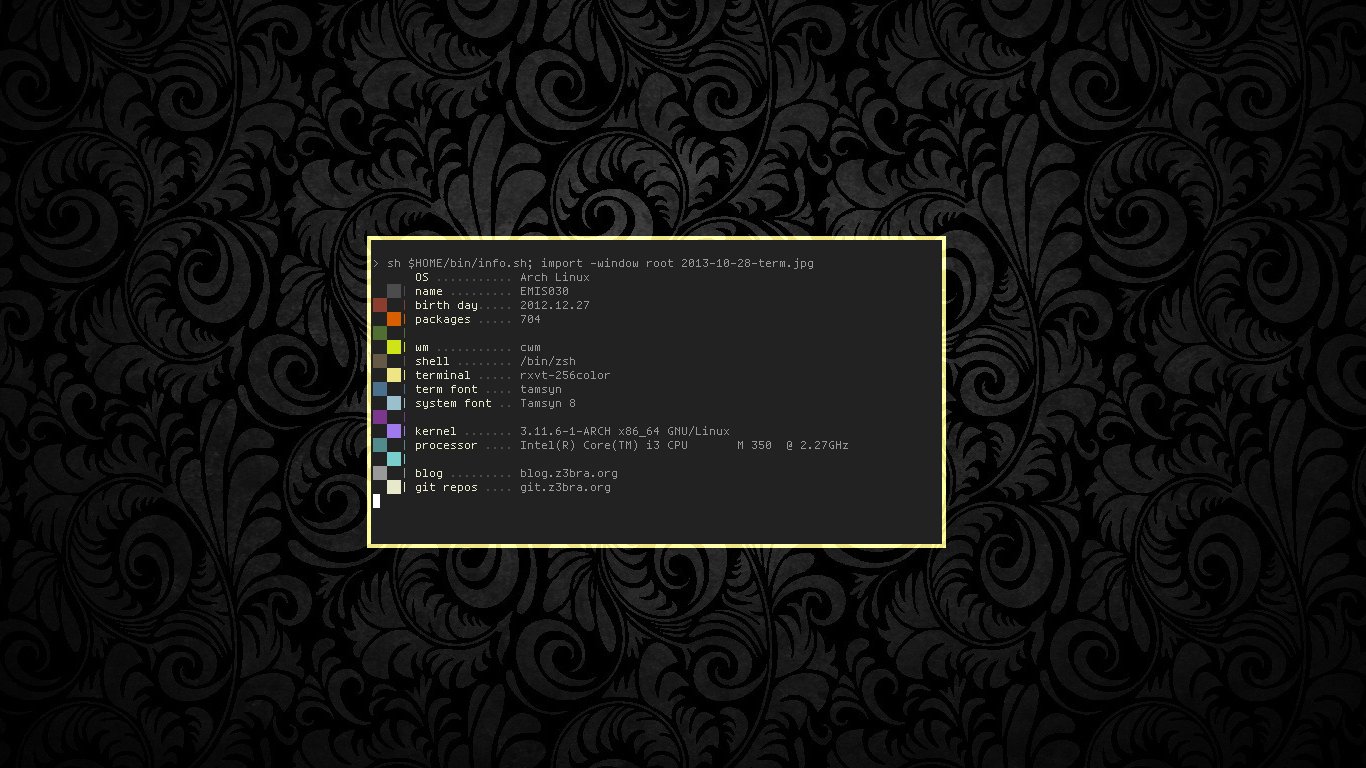 A terminal running the script
info.sh that dump 16
colors along system informations
A terminal running the script
info.sh that dump 16
colors along system informations
Shell
right after seeing the terminal, you can't avoid it's main program: the shell.
If you don't know this already, the shell is the link between the user and the
programs. It's a program you will communicate with to manipulate your system.
An important program tough. Choose it carefully then. Here is the main shell
list:
- sh — The historical shell
- bash — Improved shell, based on sh
- zsh — An extremly powerfull shell with a great completion system
- fish — A user friendly shell, really different from the above
- csh — The Berkeley UNIX shell
- tcsh — An improvement of csh
I personnaly used zsh a lot because it has a feature I like, the right prompt. also, it's completion system is really great (argument completion is a good thing to have, trust me..). But I now use bash again because I don't need much of the features zsh provide, so that was kinda like using a chainsaw to cut a thin rope.
Anyway, I'll treat here only the "standard shell": bash
The first thing you will see from the shell is its prompt. The prompt is a set of characters that gives info to the user, and invite him to input commands. Basically, it looks like this:
$
Fancy huh ? The prompt chars are contained in the variable PS1 for sh/bash, and PROMPT/RPROMPT for zsh.
$ PS1='z3bra-$ '
z3bra-$
(You don't have to issue the two command to make it works.) Take a look at the bash manpage, section "Prompting" for more info on how to tweak it. Here is my personnal prompt:
bashrc

# Fancy prompt
fg=('\[\e[0;30m\]' '\[\e[0;31m\]' '\[\e[0;32m\]' '\[\e[0;33m\]'
    '\[\e[0;34m\]' '\[\e[0;35m\]' '\[\e[0;36m\]' '\[\e[0;37m\]'
    '\[\e[1;30m\]' '\[\e[1;31m\]' '\[\e[1;32m\]' '\[\e[1;33m\]'
    '\[\e[1;34m\]' '\[\e[1;35m\]' '\[\e[1;36m\]' '\[\e[1;37m\]')
nofg='\[\e[0m\]'

PS1='';[ -n "$SSH_CLIENT" ] && PS1="${fg[8]}$(hostname|cut -b-2) "
export PS1=" ${PS1}${fg[11]}──── ${nofg}"
And my old zsh prompt:
zshrc

PROMPT=" %{$fg_bold[yellow]%} »  "
RPROMPT="%{$fg[black]%}%M:%{$fg_bold[yellow]%}%~%{$reset_color%}   "
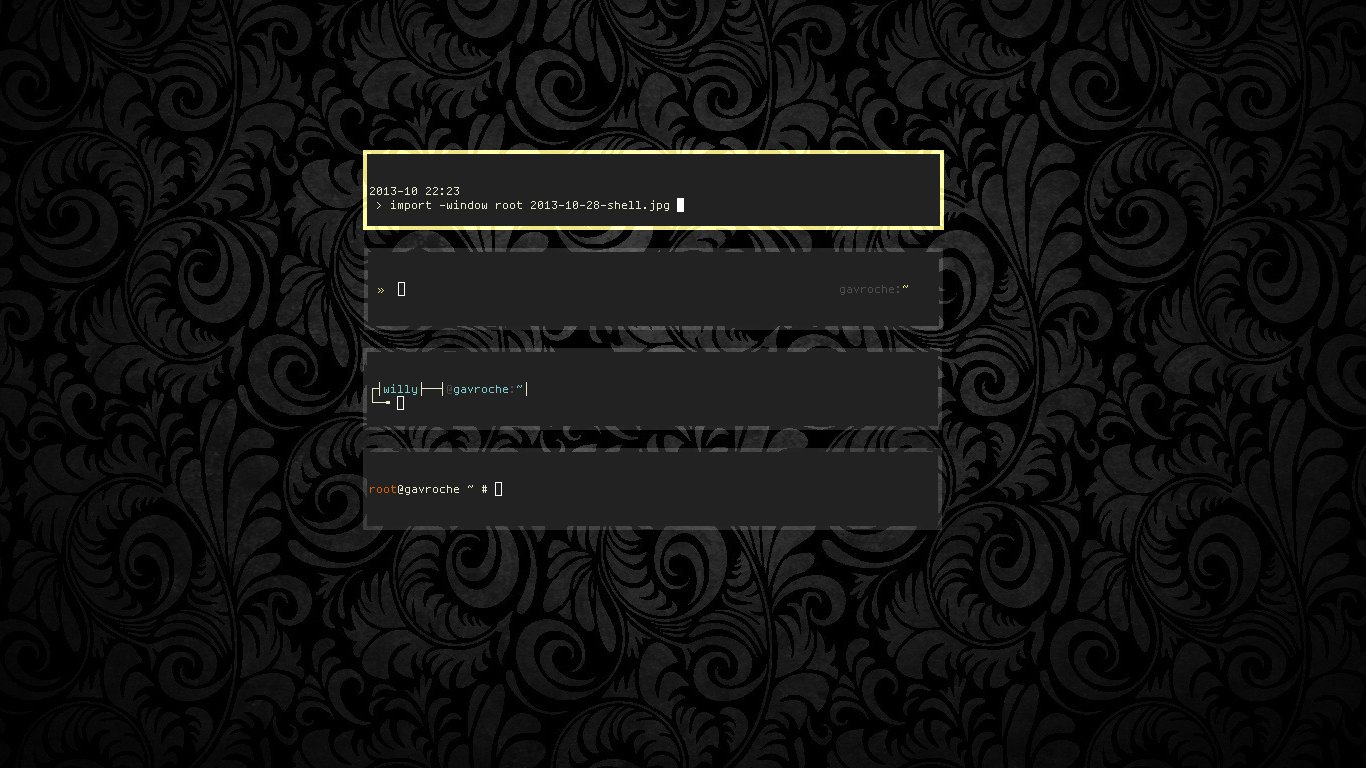 A few different prompts, from top to bottom: sh, zsh,
bash, zsh
A few different prompts, from top to bottom: sh, zsh,
bash, zsh
CLI tools
The shell is the core of a UNIX/Linux based system. So having a bunch of fast, light and efficient CLI tools is a must. There are applications for (almost) everything you do on a daily basis with you computer: IRC clients, Text editor, Video games, Web browsers, image viewer, ...
Okay, I agree that some of them are not really practical to use
everyday. Mostly when it involve images (web lurking, image
processing, gaming, ...).
But when you don't need images, unleash your
shell!
Use CLI based app for text-based task. It has many advantages:
- ALWAYS fit your colorscheme (see Terminal)
- Focus on usability
- Integrate well with your whole setup
- This is fast as hell
- This is powerfull as hell
- You look like a hacker
I personnaly use vim, irssi and
mutt on a daily basis.
As an alternative, take a look at emacs,
weechat and
Alpine.
 Mandatory screenshot of the setup with those apps (and
custom themes).
Mandatory screenshot of the setup with those apps (and
custom themes).
top-left: vim
top-right: mutt
bottom-left: tmux
bottom-right: irssi
Status bar
All of this is great, but I think that if you want to check the time, you're not willing to open a terminal, and type:
date +%H:%M
It's not really practical most of the time. The same can apply to
the amount of free space, to current volume level or the number of
unread mails you have.
That's what status bar are made for. They pick infos for you and
display them in a thin bar on an edge of your screen.
My bar of choice is, by far,
bar ain't recursive, by Lemon Boy.
It is light, fast and simple. Exactly how I like it! the purpose is simple:
- Write a script that output a bunch of informations
- Pipe that script into the bar
- Run them within an infinite loop!
That is all you need. For example, if you only need the date in the bar:
while :; do date; done | bar &
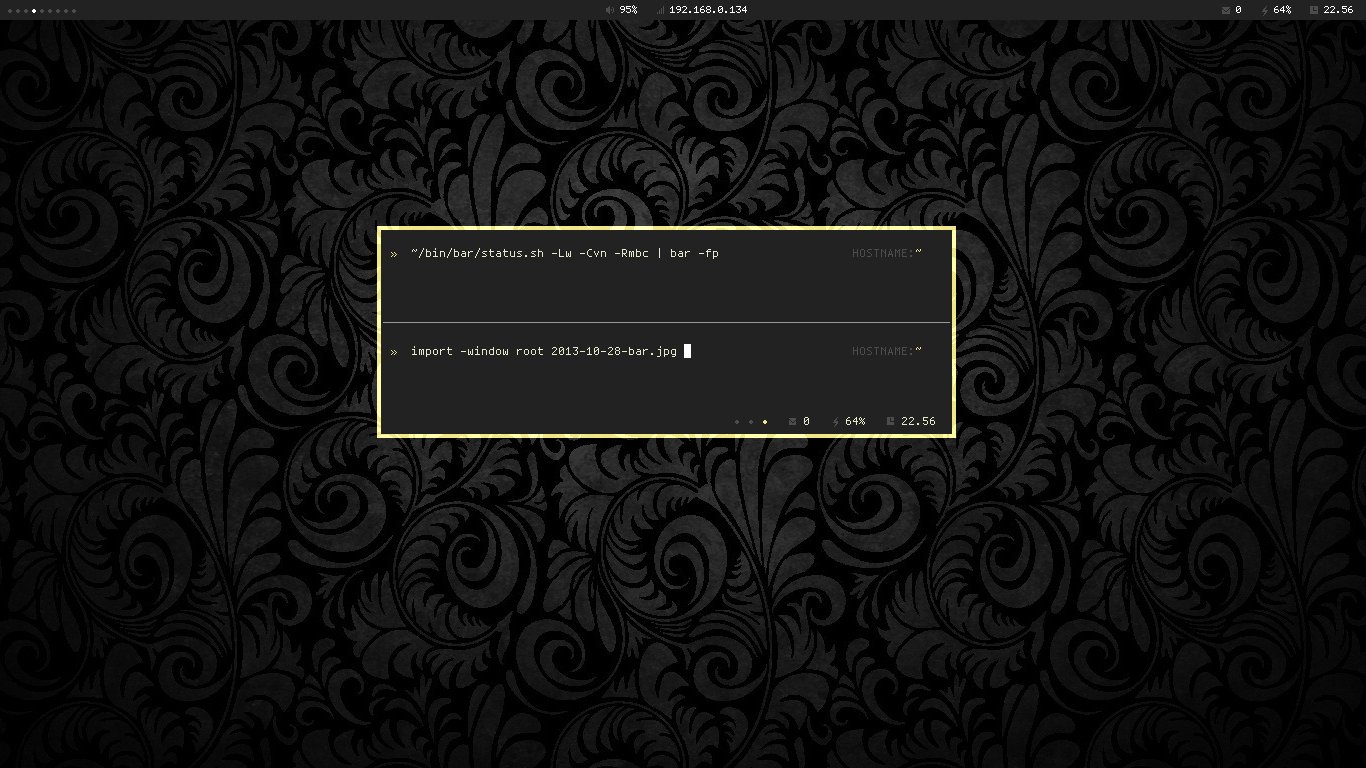
And there you go! You can achieve really great looking stuff with that simple process:
 You can also choose to put your status bar within a
terminal multiplexer status bar,
as phyrne suggested
in one of his blog post
You can also choose to put your status bar within a
terminal multiplexer status bar,
as phyrne suggested
in one of his blog post
Integration
Now that we potentially have a working desktop, let make it spawn
correctly, using ONLY one file: ~/.xinitrc.
That magical file is simply a shell script that is called by default
with startx. In fact, when you proceed this command, it does the following:
$ startx ~/.xinitrc -- :0
It source your ~/.xinitrc, and launch it on the Xorg server number 0. To launch your wm of choice from the xinitrc, just add the command to launch it in the file, preceded by 'exec'. It will replace the current process (your shell) by the window manager, so that the session will terminate with your WM.
Okay, now you have the theory. Before starting to pratice, I'll give you a few hints for a "good" xinitrc (yeah, I love making lists):
- Launch ONLY session related commands
- Make it evolutive, so that you can spawn multiple X sessions at the same time
- Fork every command, except those that are dependent, to speed up the desktop spawning
Finally, here is my own xinitrc
xinitrc

#!/bin/bash
#
# ~/.xinitrc
#

# load nvidia config
nvidia-settings -l

# Set wallpaper
hsetroot -tile ~/usr/img/bg/stripes.png &

# default cursor
xsetroot -cursor_name left_ptr &

function wm() {
# Load X resources
xrdb -load ~/.Xresources &

# personnal bindings
xbindkeys

# set WM name
xsetroot -name $1

#status bar
~/bin/bar/status.sh & # it acts kinda weirdly

# Compositing
# enable RGBA module for GTK
export GTK_MODULES=rgba

#compton -cCb -t-5 -l-5 -r4.2 -o.4
compton -cb -o0

# spawn window manager
exec $1
}

[[ -z $1 ]] && wm cwm

wm $1
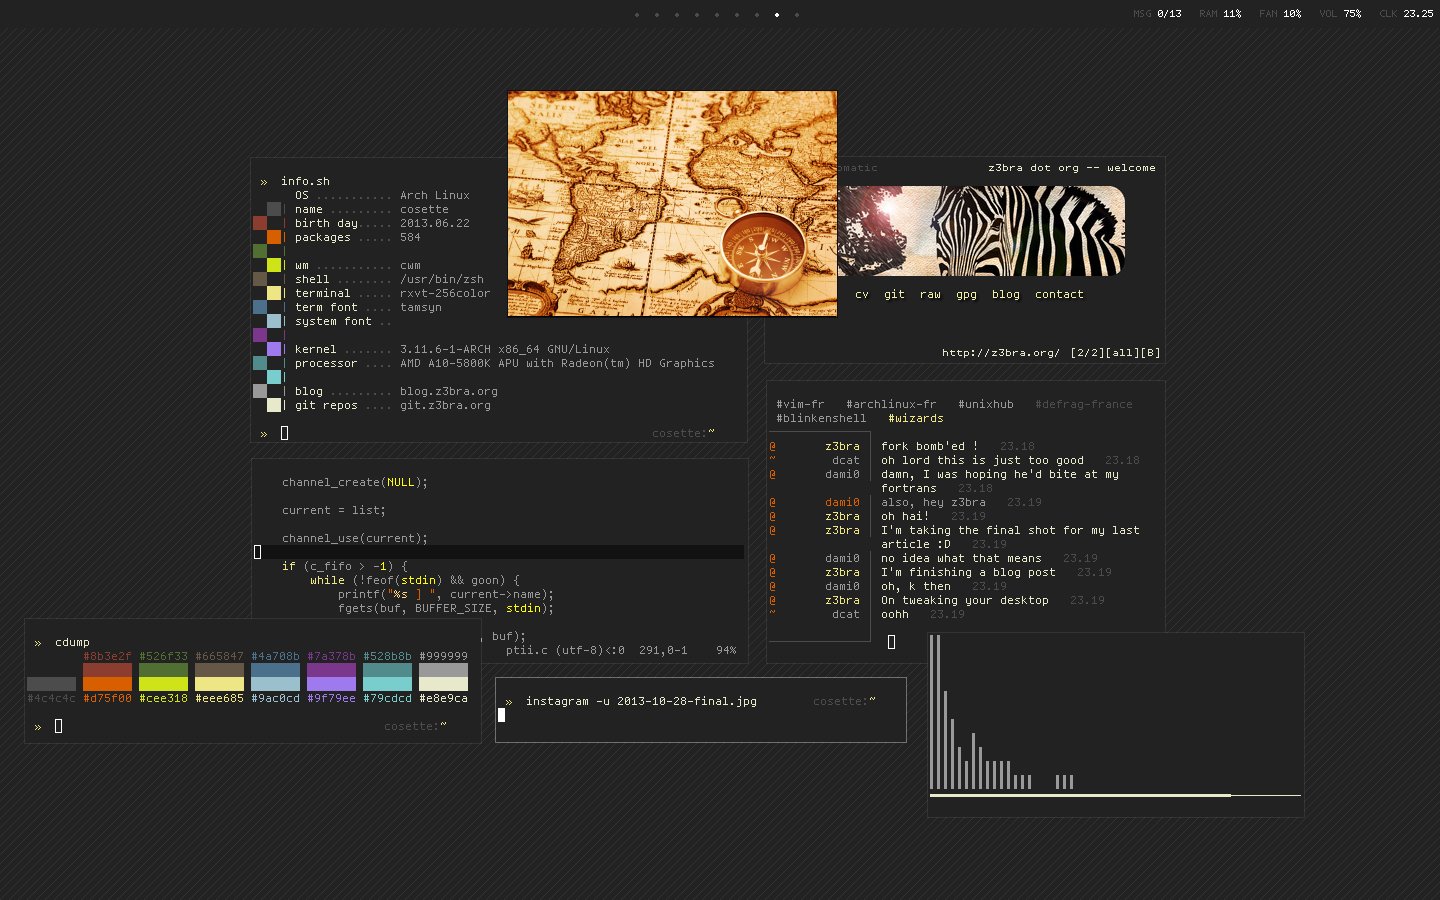 That shot show off the whole setup, with prompt, bar,
applications, etc... I hope you will like it!
That shot show off the whole setup, with prompt, bar,
applications, etc... I hope you will like it!
Conclusion
The end, finally. That is a damn long article. I have deliberately not expanded some point by lack of "space". I want this article to end someday. It will give you a good start to tweak your own setup, and make it look like what you want it to look.
Make your environment yours, and have fun doing so!